Network Priority Order
When multiple network connections (Wi-Fi, Ethernet (RJ45), and 4G/LTE) are available at the same time, the Comlada device automatically selects the network based on priority to ensure stable and efficient data communication.
Priority Ranking
- Ethernet (RJ45) – Highest priority
- Wi-Fi – Secondary priority
- 4G/LTE – Lowest priority
The device will always attempt to connect using the highest-priority available network. If the primary network becomes unavailable, the device automatically switches to the next available network in the priority order to maintain uninterrupted data transmission.
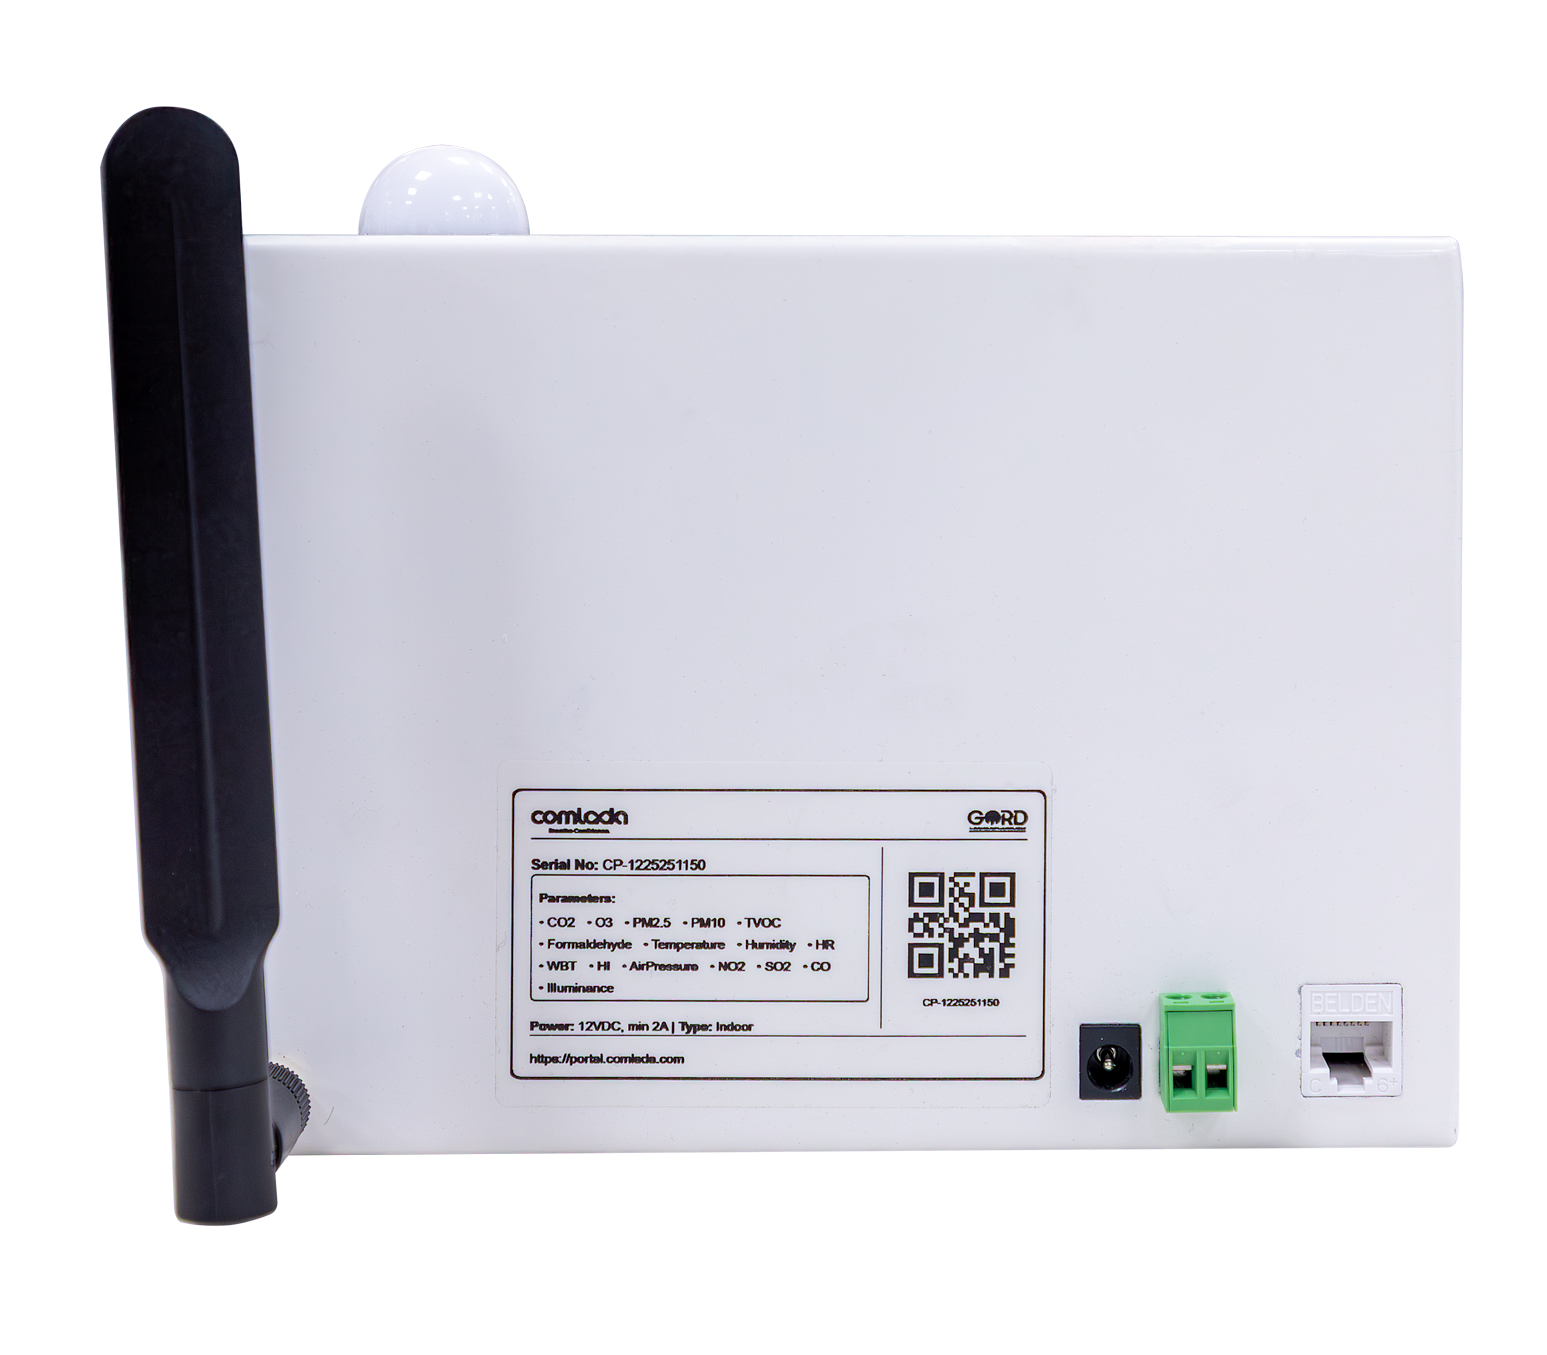
Device Ports Overview
The rear side of the Comlada device is equipped with three ports that provide power supply, network connectivity, and external communication. These ports are clearly labeled on the device and are used during installation, configuration, and system integration.
| Port | Purpose |
|---|---|
| Ethernet Port (RJ45) | Used to connect the device to a local network for stable and secure data communication. Supports continuous real-time data transmission to the monitoring platform. |
| Modbus RTU (RS-485) | The RS-485 port supports Modbus RTU mode. It is used for communication with external systems such as Building Management Systems (BMS) and other compatible controllers. |
| Power Port (12V DC) | Supplies power to the Comlada device using the provided adapter. Always use the recommended power source for safe and reliable operation. |
Important: Before beginning network provisioning, ensure the device is powered on using the 12V DC power adapter connected to the power port.
Method 1: Wi-Fi Provisioning
Wi-Fi provisioning enables wireless connectivity through your local network infrastructure. This method is suitable for locations with established Wi-Fi networks and provides flexible device placement without requiring physical cable connections.
Step-by-Step Wi-Fi Setup
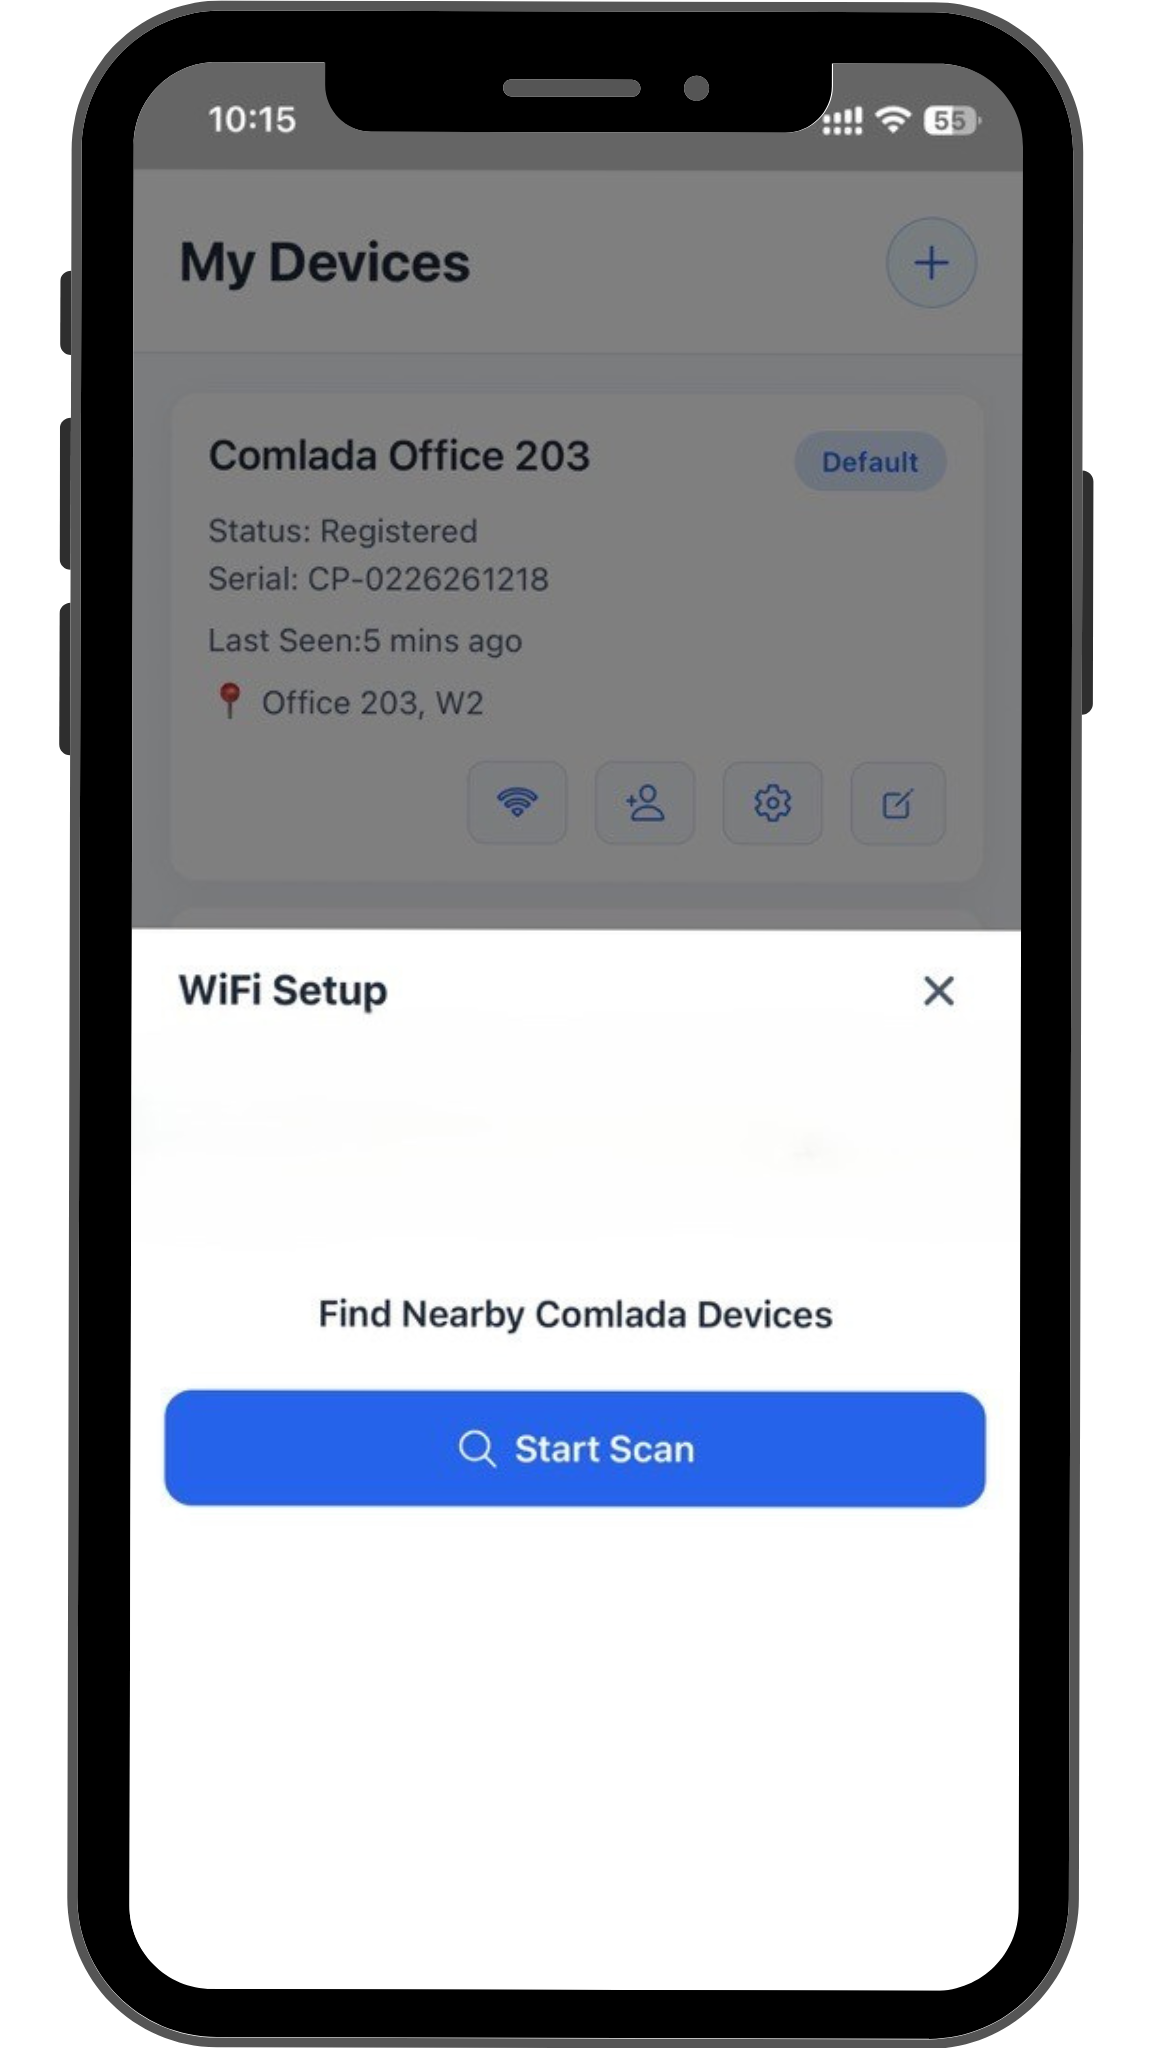
- Access Provisioning Menu
After adding the device to your account, navigate to My Devices tab in the Comlada mobile app.
Select "Wi-Fi Icon" to begin network configuration.
-
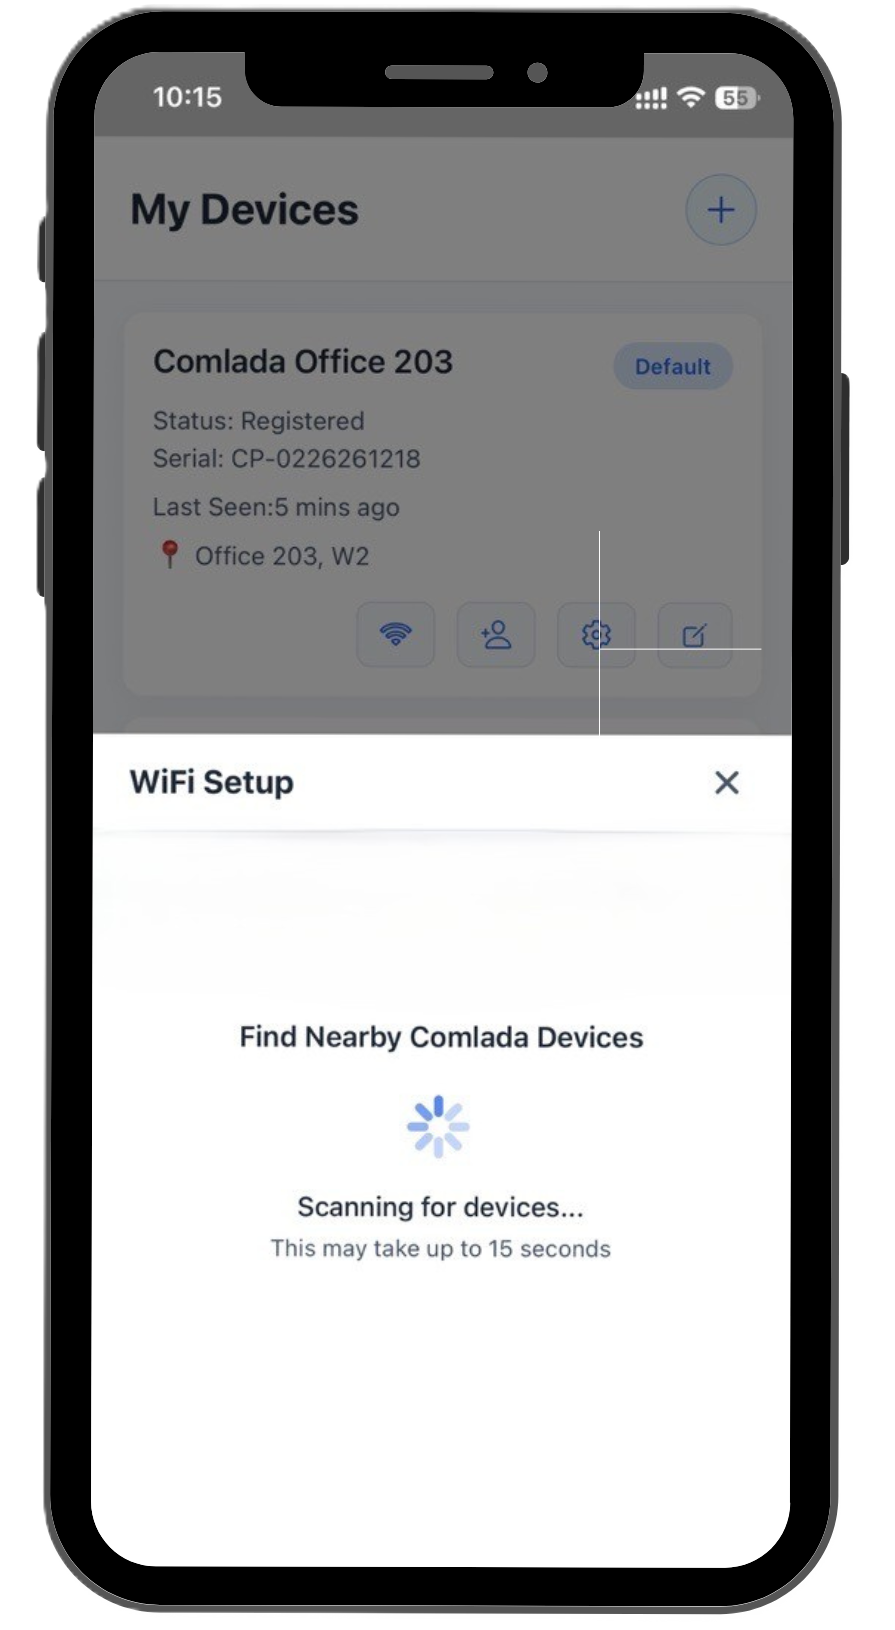
Scan for Available Networks
Then press "Start Scan" button to scan for available Wi-Fi networks within range of the Comlada device. A list of detected networks appears showing network names (SSIDs) and signal strength indicators. -
Select Your Network
From the list of available networks, select your desired Wi-Fi network by tapping on the network name. -
Enter Network Password
Enter the Wi-Fi network password in the provided field.
Ensure the password is entered correctly, as incorrect credentials will prevent successful connection. -
Verify Connection
Once connected successfully, the device status updates to "Online" in your dashboard.
The device begins transmitting air quality data to the Comlada monitoring platform within 1 minute.
Method 2: Ethernet (RJ45) Connection
Ethernet connection provides the most stable and reliable wired internet connection for continuous data transmission. This method is recommended for installations requiring high reliability and minimal connectivity interruption.
Step-by-Step Ethernet Setup
-
Locate Ethernet Port
Identify the RJ45 Ethernet port on the rear side of the Comlada device. -
Connect Ethernet Cable
Connect one end of a standard Ethernet cable to the device's RJ45 port.
Connect the other end to an available port on your network switch, router, or wall outlet with network access. -
Automatic Connection
The Comlada device automatically detects the Ethernet connection and establishes network connectivity.
No additional configuration is required through the application. -
Verify Connection
Check the device status in your dashboard to confirm "Online" status.
The device begins transmitting data within 1 minute upon successful Ethernet connection.
Ethernet Connection Benefits
- Highest network priority for uninterrupted connectivity
- Stable connection unaffected by wireless interference
- Consistent data transmission rates
- No password configuration required
- Recommended for critical monitoring installations
Note: Ensure the Ethernet cable is securely connected at both ends and that the network port provides active internet access.
Method 3: 4G/LTE Connectivity
4G/LTE connectivity enables independent internet connection using a cellular network. This method is suitable for remote sites or locations without local network infrastructure access such as Wi-Fi or Ethernet.
Step-by-Step 4G/LTE Setup
-
Obtain Compatible SIM Card
Acquire a data-enabled SIM card from a cellular service provider with 4G/LTE coverage in your installation area.
Ensure the SIM card has an active data plan with sufficient data allowance for continuous monitoring. -
Automatic Network Registration
The Comlada device automatically registers with the cellular network using the SIM card credentials.
Network registration typically completes within 1-2 minutes. -
Verify Connection
Check the device status in your dashboard to confirm "Online" status.
The device begins transmitting air quality data through the 4G/LTE network.
Important: After adding or changing the SIM card, the device must be restarted for the changes to take effect and establish cellular network connection.
4G/LTE Connection Requirements
- SIM Card Type: Standard or Micro SIM (depending on device model)
- Network Coverage: Active 4G/LTE coverage at installation location
- Signal Strength: Minimum signal strength required for stable connectivity
Note: 4G/LTE has the lowest network priority. If Wi-Fi or Ethernet becomes available, the device automatically switches to the higher-priority connection.
Troubleshooting Network Provisioning
Wi-Fi Connection Issues
Device Not Connecting to Wi-Fi
- Verify Wi-Fi password is entered correctly without extra spaces
- Check that device is within acceptable range of Wi-Fi access point
- Ensure Wi-Fi network has active internet connectivity
- Restart the device and attempt provisioning again
Wi-Fi Connection Drops Frequently
- Reduce physical obstacles between device and Wi-Fi access point
- Verify no interference from other wireless devices
- Consider switching to Ethernet connection for improved stability
Cannot Find Wi-Fi Network in Scan List
- Confirm the Wi-Fi network is broadcasting SSID (not hidden)
- Move device closer to the access point temporarily during setup
- Restart the Wi-Fi access point and scan again
Ethernet Connection Issues
No Connection After Cable Connection
- Verify Ethernet cable is securely connected at both ends
- Test Ethernet cable with another device to confirm cable functionality
- Check that network port provides active DHCP and internet access
- Inspect RJ45 port on device for physical damage
- Try a different Ethernet cable or network port
Intermittent Ethernet Connection
- Check for damaged or worn Ethernet cable
- Ensure cable is not bent sharply or pinched
- Verify network switch or router is functioning properly
4G/LTE Connection Issues
Poor 4G/LTE Performance
- Check cellular signal strength indicator in device status
- Relocate device to area with better cellular coverage if possible
- Verify data plan has not exceeded monthly allowance limits
- Consider external antenna installation for improved signal reception
- Contact service provider regarding network coverage in the area
General Connection Issues
Device Shows Offline Status
- Verify device power supply is connected and LED indicators are active
- Check all network cables are securely connected
- Restart device by disconnecting and reconnecting power
- Wait 2-3 minutes for device to complete startup and connection process
- Verify network has active internet connectivity
Data Not Appearing in Dashboard
- Confirm device status shows "Online" in the application
- Verify device registration was completed successfully
- Wait 5-10 minutes for initial data synchronization
- Refresh dashboard page or restart application
Support
For assistance with device provisioning or network configuration issues, contact the Comlada support team.
Email: info@gord.qa
Response Time: Within 24 hours during business hours
When contacting support regarding provisioning issues, please provide:
- Device serial number
- Network connection method being used
- Detailed description of the issue
- Device status shown in dashboard
- Screenshots of error messages (if applicable)
Next Steps After Successful Provisioning:
- Verify device status shows "Online" in dashboard
- Confirm real-time air quality data appears in monitoring platform